Category Archives: Qt

Installing Harbour, Qt and hbQt on osx

Now that we have a working osx Harbour setup, it is time to add other pieces. My goal is to port a software that runs on Windows under hbQt to Mac (and linux).

So, as the first step, I install the brew package manager, that will handle the setup of external software for me.

To install brew it is necessary to run a script that is downloaded from the web. I report it here but PLEASE do check on its website (http://brew.sh/) it if it is still valid when you will work on it.

/usr/bin/ruby -e "$(curl -fsSL https://raw.githubusercontent.com/Homebrew/install/master/install)"

The script will ask for confirmation and for sudo password.

When ready, we can install Qt5.

brew install qt5
brew linkapps qt5

As for today, it will install Qt 5.6.1. With the second line Qt5 bundled applications are installed in Launchpad.

It’s time to download and compile hbQt, but before I want to update my env setup and I do as usual with a script file set_harbour561.sh:

PATH=/usr/local/opt/qt5/bin/:~/harbour/bin/darwin/clang:$PATH
export QT_PLUGIN_PATH=/usr/local/opt/qt5/plugins/
export HB_WITH_QT=/usr/local/opt/qt5/include/
## rem HB_QT_MAJOR_VER can probably become deprecated in next
## rem Harbour/qtcontribs releases.
export HB_QT_MAJOR_VER=5

and I update the env variables with
. set_harbour561.sh

and then I checkout the sources

cd /harbour
svn checkout http://svn.code.sf.net/p/qtcontribs/code/trunk addons

Before compiling hbQt we need to compile a contrib of Harbour, since it depends on Qt and some hbQt programs depend on it. So compile the contribs:

cd <path>/harbour/contribs
make

Then move to the addons directory:

cd <path>/harbour/addons

We need to modify qtcontribs.hbp, since some Qt modules are not available on osx. So add a # in front of the line of:
hbqtdeclarative.hbp
and
hbqt/qtwebkit/hbqtwebkit.hbp

and finally build hbQt:

hbmk2 -jobs=4 qtcontribs.hbp

We are now ready to start hbide and hbdbu programs but you need to access osx gui to be able to use them. Both work as they should but during my tests I found some discrepancies about fonts, layout and GUI: Qt does its best to adapt one codebase to the GUI peculiarities of each GUI but sometimes the result is not perfect and one form dialog that is perfect on windows can have problems on osx.

Will see in another post.

Harbour and Qt on Android part 1

PLEASE NOTE: These are instructions on how I setup my dev machine on APRIL 2 2014! I used the directories and the setup I think are better suited for my development!!! If you don’t have a standard or want to follow my next posts please use the same dir tree.

Prepare the dir tree

I will put all the stuff related to Harbour on Android inside c:\android directory. This will include standard x86 Harbour, Harbour for android, android SDK and NDK.

Qt and Java will be installed in default directories so that they will be available systemwide.

Download and install Java JDK

Download and install Java JDK as usual (you may already have it on your pc)

Download and install Qt 5.2

Go to http://qt-project.org/downloads and download “Qt 5.2.1 for Android (Windows 32-bit, 1.1GB)”.

This is the version available on april 2, 2014.

Install it using default dir (c:\qt\qt5.2.1). In “Select Components” open Tools and select MinGW 4.8. As I said this is a system-wide installation of Qt and this compiler will be used to develop windows based programs. In the past I also installed Qt source code but I don’t do anymore…

Proceed with installation but do not launch Qt Creator at the end.

Download & unzip SDK and NDK

Go here https://developer.android.com/sdk/index.html?hl=sk and download ADT bundle (button on the right). It’s a 510 MB zip download.

On the left menu click on “Download NDK” and download it. It’s another 496 zip download.

Unzip both files into c:\android and shorten the dir names. I prefer to keep the reference to the version instead of using names like sdk or ndk. For your reference at the end you should have these dirs:

c:\android\20140321\sdk
c:\android\r9d\tests

Go to c:\android\20140321 directory and run SDK Manager application. It will take some seconds to start (it’s java) and it will propose to install a couple of programs (Android support Library and Google USB drivers) and upgrade a couple more (depending on the installed ADT).

Open the Android 4.3 (API18) and select SDK Platform and ARMEABI v7a System Image.

Proceed to install.

Download & unzip ant

Download Apache ant from http://ant.apache.org

Unzip into c:\android so that you have the following dir tree (versions may change, one level of dir must be removed):

c:\android\apache-ant-1.9.3

Setup Qt Creator

Configure directories

Start Qt Creator. Menu Tools -> Options.

On the leftmenu click on “Android”. On the right panel browse and select the folders requested.

The values should be:

Android SDK location: C:\android\20140321\sdk
Android NDK location: C:\android\r9d
Ant location: C:\android\apache-ant-1.9.3\bin\ant.bat   (it was autodiscovered in my setup)
JDK location: C:\Program Files\Java\jdk1.7.0_45

Click on Apply button.

Configure test devices

Click on Start Android AVD Manager, it will open a new window. Click on New and crete a new device. I usually create a generic tablet and a phone.

AVD Name: Tablet
Device: 10.1" WXGA
Target: Android 4.3 - API Level 18
CPU/ABI: ARM (armeabi-v7a)  (autoselected)
Skin: Skin with dynamic hardware controls
Check Use Host GPU


AVD Name: Phone
Device: Nexus S
Target: Android 4.3 - API Level 18
CPU/ABI: ARM (armeabi-v7a)  (autoselected)
Skin: Skin with dynamic hardware controls
Check Use Host GPU

It is possible to create specific devices but it can be done later. Close the Android AVD Manager. To make the new devices appear on the list, click the Add button under the Start Android AVD Manager button, and then click Cancel. The devices Tablet and Phone should appear in the list. Click Apply and the Ok to close the configuration window.

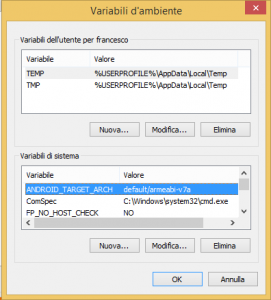
To solve a problem introduced by the new Android SDK, waiting for the new Qt to adapt, it is necessary to add an environment variable to our operating system.

    ANDROID_TARGET_ARCH     default/armeabi-v7a

Since this env variable must be available to programs running from the gui, I added it in the system environment variables as in this picture (you have to find it in your operating system and language):
env_variables

Compile Harbour & Harbour for android

Clone Harbour source code (see http://www.mozzarellaincarrozza.it/harbour/compiling-harbour-for-qt-from-git/) but clone it in this way:

c:
cd \android
git clone https://github.com/harbour/core.git Harbour

Check you have this dir tree:

C:\android\harbour\win-make.exe

We now have to compile standard Harbour and then Harbour for android.

First of all we need to set some env variables. I don’t use system-wide env settings so that I can have multiple Harbour and qt versions on the same workstation. I use batch files to set them.

Save this script into c:\android\harbour with name set_android.bat and run it:

PATH=c:\qt\qt5.2.1\tools\mingw48_32\bin;C:\qt\qt5.2.1\5.2.1\mingw48_32\bin;C:\android\harbour\bin\win\mingw;c:\bin;%PATH%;
SET QT_PLUGIN_PATH=C:\Qt\qt5.2.1\5.2.1\mingw48_32\plugins
SET HB_WITH_QT=C:\qt\qt5.2.1\5.2.1\mingw48_32\include
rem HB_QT_MAJOR_VER can probably become deprecated in next
rem Harbour/qtcontribs releases.
SET HB_QT_MAJOR_VER=5

Then run win-make and wait while standard Harbour is compiled.

cd \andorid\Harbour
win-make

Since this is a Harbour that is used only for android, we may avoid compiling contribs to save time/space…

When compilation is completed, copy and paste the build_cross_android.bat file listed below and store it in c:\android\harbour. The original script is from Przemek. The script must be updated to point to the right directories.

Run build_cross_android.bat. The script will compile a cross-compiled version of Harbour for android that is installed in the same tree.

The script will also create a new script to be used to cross-compile.
PLEASE NOTE: the script creates file hbmk2a.bat in c:\android\harbour directory. Please copy the file into c:\android\harbour\bin\win\mingw so that it is under PATH.

rem @echo off
rem Original version of this script by Przemek
rem 
rem Please change directory names

set NDK=C:\android\r9d
set QT=C:\Qt\Qt5.2.1\5.2.1\android_armv7\include
rem set HB_INSTALL_PREFIX=C:\android\hb.android

rem set LVL=3
set LVL=9
rem set LVL=14

set CPU=arm
rem set set CPU=x86
rem set set CPU=mips

rem set CCOMP=4.6
set CCOMP=4.8

set PLATFORM=android-%LVL%
set HOST_CPU=windows-x86_64

set SYSROOT=%NDK%\platforms\%PLATFORM%\arch-%CPU%

if "%CPU%" == "arm"  set TCHAIN=arm-linux-androideabi
if "%CPU%" == "mips" set TCHAIN=mipsel-linux-android
if "%CPU%" == "x86"  set TCHAIN=x86

set HB_PLATFORM=android
set HB_COMPILER=gccarm
set HB_CCPREFIX=%NDK%\toolchains\%TCHAIN%-%CCOMP%\prebuilt\%HOST_CPU%\bin\%TCHAIN%-

set HB_BUILD_3RDEXT=no
set HB_WITH_QT=%QT%

set HB_USER_CFLAGS=
set HB_USER_DFLAGS=
set HB_USER_LDFLAGS=
set HB_USER_CFLAGS=%HB_USER_CFLAGS% --sysroot=%SYSROOT%
set HB_USER_DFLAGS=%HB_USER_DFLAGS% --sysroot=%SYSROOT%
set HB_USER_LDFLAGS=%HB_USER_LDFLAGS% --sysroot=%SYSROOT% -lm

set HB_USER_CFLAGS=%HB_USER_CFLAGS% --sysroot=%SYSROOT% -I%NDK%\sources\cxx-stl\gnu-libstdc++\4.8\include -I%NDK%\sources\cxx-stl\gnu-libstdc++\4.8\libs\armeabi-v7a\include -I%NDK%\platforms\android-9\arch-arm\usr\include

if not "%1" == "clean" goto skip_clean
   win-make %1
   shift
:skip_clean
win-make install %1 %2 %3 %4 %5 %6 %7 %8 %9 > log-%PLATFORM% 2> log-%PLATFORM%.err

set HBMK2A=%HB_INSTALL_PREFIX%\bin\hbmk2a.bat

echo @echo off> %HBMK2A%
echo.>> %HBMK2A%
echo set HB_WITH_QT=%QT%>> %HBMK2A%
echo set SYSROOT=%NDK%\platforms\%PLATFORM%\arch-%CPU%>> %HBMK2A%
echo.>> %HBMK2A%
echo.>> %HBMK2A%
echo set HB_PLATFORM=%HB_PLATFORM%>> %HBMK2A%
echo set HB_COMPILER=%HB_COMPILER%>> %HBMK2A%
echo set HB_CCPREFIX=%HB_CCPREFIX%>> %HBMK2A%
echo set HB_INSTALL_PREFIX=%HB_INSTALL_PREFIX%>> %HBMK2A%
echo.>> %HBMK2A%
echo set HB_USER_CFLAGS=%HB_USER_CFLAGS%>> %HBMK2A%
echo set HB_USER_DFLAGS=%HB_USER_DFLAGS%>> %HBMK2A%
echo set HB_USER_LDFLAGS=%HB_USER_LDFLAGS%>> %HBMK2A%
echo.>> %HBMK2A%
echo hbmk2 -plat=android %%1 %%2 %%3 %%4 %%5 %%6 %%7 %%8 %%9>> %HBMK2A%

Compiling Harbour for Qt from GIT

This is a step-by-step guide to install Harbour and QtContribs from source code.

Our goal is to create a self-contained setup that can be used on a development workstation alongside different versions of Harbour and Qt.

In this setup, Harbour is never “installed” but just compiled with proper settings and only environment variables are set.

Since the nigthly build of Harbour uses an old version of the compiler not compatible with recent Qt, it is necessary to build Harbour ourselves.

If we want to be able to easily receive the updates from Harbour and QtContribs projects we should use git and svn. Otherwise you can simply download the source zip files and unpack them.
I suggest to use git and svn to download source code.

So proceed to install git and svn (TortoiseSVN, from sourceforge).

Download and install Qt 5.2

Go to http://qt-project.org/downloads and download “Qt 5.2.1 for Android (Windows 32-bit, 1.1GB)”.

This is the version available on april 2, 2014. I use the android version since this is a system-wide installation and I will use it for Android development.

Install it using default dir (c:\qt\qt5.2.1). In “Select Components” open Tools and select MinGW 4.8: this will install the compiler used to build Qt and it is the compiler we will use to compile Harbour to have maximum compatibility. In the past I also installed Qt source code but I don’t do anymore…

Proceed with installation but do not launch Qt Creator at the end since we don’t need it.

Build Harbour

I put all these source code in a directory called cvs in c:
In this directory I put all the configuration files (see below) and the source dirs.

From command prompt, go to c:\cvs directory

c:
cd \cvs
git clone https://github.com/harbour/core.git harbour

It takes some time.
Please note that we specify harbour as last parameter in the git command: it will create a clone of the repository in a directory called harbour. You should have now a c:\cvs\harbour\README.md file.

You can download the source code as a zip file clicking on the button on the right ( https://github.com/harbour/core.git ), unzipping and move/rename the directories to have the README.md file in the position shown above.

If you want to create multiple parallel versions of Harbour, for example one for production code and one to test new features, you can clone Harbour changing the last paramenter.

Now it is time to set the environment. I never do this in a system-wide setting but use a batch file that I call after the Qt version or the specific use of that setup.
This file sets the environment variables needed to compile and use Harbour and I called it set_qt521.bat.

PATH=c:\qt\qt5.2.1\tools\mingw48_32\bin;C:\qt\qt5.2.1\5.2.1\mingw48_32\bin;C:\cvs\harbour\bin\win\mingw;c:\bin;%PATH%;
SET QT_PLUGIN_PATH=C:\Qt\qt5.2.1\5.2.1\mingw48_32\plugins
SET HB_WITH_QT=C:\qt\qt5.2.1\5.2.1\mingw48_32\include
rem HB_QT_MAJOR_VER can probably become deprecated in next
rem Harbour/qtcontribs releases.
SET HB_QT_MAJOR_VER=5

Let’s examine the dirs of PATH:

  • c:\qt\qt5.2.1\tools\mingw48_32\bin
    c/c++ mingw compiler included in Qt
  • C:\qt\qt5.2.1\5.2.1\mingw48_32\bin
    all the tools of Qt
  • C:\cvs\harbour\bin\win\mingw
    This dir doesn’t exist yet but Harbour build process will copy here all the Harbour executable
  • c:\bin
    is a dir where I put all the tools I use during code development (diffs tools, grep…)
  • QT_PLUGIN_PATH is needed to run programs that use Qt.
    HB_WITH_QT specifies at build time which version of Qt we want to use
    HB_QT_MAJOR_VER specifies which Qt major version we are using. It may be removed in the future

    It is now easy to create copies of this file and adapt the dirs to use other Qt versions or other Harbour dirs.

    Now build Harbour.

    set_qt521.bat
    cd harbour
    win-make clean
    win-make
    

    Harbour will be compiled. It is normal that near the end there are some warnings/errors during compilation of contribs: the build process checks for the presence of supported libraries and skip build if they are not present.

    When compilation is terminated we can check:

    C:\cvs\harbour>harbour --version
    Harbour 3.2.0dev (r1404111536)
    Copyright (c) 1999-2014, http://harbour-project.org/
    

    Compile QtContribs

    With TortoiseSVN do a checkout of the repository, using data as per the following screenshot. If you are behind a firewall, use http instead of svn in the url (http://svn….)
    (To help with copy&paste: svn://svn.code.sf.net/p/qtcontribs/code/trunk C:\cvs\harbour\addons )
    svn-addons
    Click ok and wait for the checkout.

    You now have this file:
    c:\cvs\harbour\addons\qtcontribs.hbp

    You can download the source file zip from Sourceforge, uncompress it, rename the directory and move it to have the file in the position shown above.

    NOTE OF 17 April 2014: Pritpal added some new features but there are some problems compiling them. So please edit qtcontribs.hbp and rem these lines:

    #### hbqt/qtpositioning/hbqtpositioning.hbp
    #### hbqt/qtwebsockets/hbqtwebsockets.hbp
    #### hbqt/qtbluetooth/hbqtbluetooth.hbp
    

    Now start compilation:

    cd addons
    hbmk2 qtcontribs.hbp
    

    When completed you can check running hbide.

    hbide
    

    Opening menu Help -> About Harbour IDE you should get something like this:
    hbide-about

    What’s next

    From now on, when you need to use this version of Harbour with this version of Qt you can run set_qt521.bat and compile your programs. Please note that you can compile programs that don’t use Qt !